
Working with Workflows
Use coding agents to create GitHub Agentic Workflows or remix from existing workflows. Once a workflow is in the repository, edit its Markdown source, compile configuration changes, debug failed runs, and keep it current with the gh aw CLI.
Configuring Your Repository for Agentic Authoring
Section titled “Configuring Your Repository for Agentic Authoring”Configure the repository with the files used by coding agents to create and maintain agentic workflows. Run this prompt in a coding agent:
Initialize this repository for GitHub Agentic Workflows using https://raw.githubusercontent.com/github/gh-aw/main/install.mdAlternatively, run:
gh aw initCommit and push the generated files to the repository.
Creating Workflows using the GitHub Web Interface
Section titled “Creating Workflows using the GitHub Web Interface”Follow Create a New Workflow with the GitHub Web Interface to create a workflow from the Agents tab in a repository.
Creating Workflows Using a Coding Agent
Section titled “Creating Workflows Using a Coding Agent”Follow Create a New Workflow with a Coding Agent or VS Code to create and compile a workflow with a coding agent that has access to the repository.
Creating Workflows with the Creation Wizard
Section titled “Creating Workflows with the Creation Wizard”Use the creation wizard with a coding agent such as Claude Code or GitHub Copilot CLI. The wizard guides you through selecting triggers, tools, safe outputs, and permissions, then generates a prompt for the coding agent to create the workflow.
The coding agent may need authentication and repository access before it can apply and compile the generated workflow.
Creating Workflows by Remixing
Section titled “Creating Workflows by Remixing”Use a coding agent to import an existing workflow when you want to adapt its behavior or configuration for another repository. Start the agent in the target repository and provide the source URL using the same create.md technique used for a new workflow:
Create a workflow for GitHub Agentic Workflows using https://raw.githubusercontent.com/github/gh-aw/main/create.md
Use this existing workflow as the starting point:https://github.com/OWNER/REPO/blob/main/workflows/WORKFLOW.md
Preserve its purpose, but adapt its labels, assignees, branch names, permissions, triggers, tools, and outputs to this repository. Follow this repository's contribution instructions, compile the workflow, and report the validation performed.
Add any project goals or constraints after the prompt. Review the resulting source and generated lock file before merging. For an unchanged or centrally managed workflow, use gh aw add instead.
Creating Workflows by Dictation
Section titled “Creating Workflows by Dictation”When creating workflows with speech-to-text, use the dictation instructions to correct terminology and formatting.
The prompt normalizes terms such as “ghaw” to “gh-aw” and “work flow” to “workflow,” removes filler words, and turns conversational input into an imperative task description. Load it into the assistant before or after dictating.
Adding Existing Workflows
Section titled “Adding Existing Workflows”Use gh aw add-wizard to add a workflow from a repository with interactive guidance:
gh aw add-wizard githubnext/agentics/daily-repo-statusYou can also use a full GitHub URL or skip the API key prompt when the required secret is already configured:
gh aw add-wizard https://github.com/githubnext/agentics/blob/main/workflows/daily-repo-status.mdgh aw add-wizard githubnext/agentics/daily-repo-status --no-secretFor non-interactive installation, use gh aw add. Pin a version when updates must be controlled:
gh aw add githubnext/agentics/ci-doctorgh aw add githubnext/agentics/ci-doctor@v1.0.0gh aw add githubnext/agentics/workflows/ci-doctor.mdThe command adds the workflow Markdown, generates its lock file, records its source for later updates, and fetches declared resources and workflows referenced by dispatch-workflow. Workflows marked private: true cannot be added to another repository.
Commit and push the added workflow and its generated files. See the CLI command reference for --name, --pr, --force, --engine, and other installation options.
Editing Workflows
Section titled “Editing Workflows”An agentic workflow has YAML frontmatter and a Markdown body. The body is loaded at runtime, so changes to instructions, output templates, context, conditions, and examples take effect on the next run without recompilation.
Changes between the frontmatter --- markers require recompilation. This includes triggers, permissions, tools, network settings, safe outputs, MCP scripts, runtimes, imports, custom jobs, engine selection, timeouts, and roles.
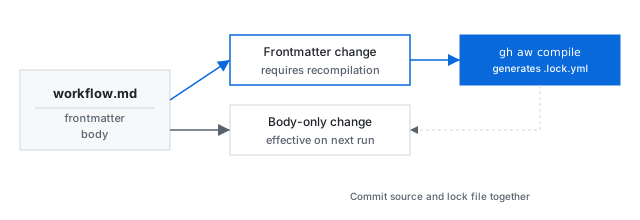
After a frontmatter change, run:
gh aw compile .github/workflows/<workflow-name>.mdCommit the Markdown source and generated .lock.yml file together. Compiling after body-only changes is also safe and may be required by repository policy to keep generated files current.
Debugging Workflows
Section titled “Debugging Workflows”Give a coding agent the failed run URL and the standalone debugging prompt:
Debug this workflow run using https://raw.githubusercontent.com/github/gh-aw/main/debug.md
The failed workflow run is at https://github.com/OWNER/REPO/actions/runs/RUN_IDThe agent uses the prompt to install the CLI if needed, inspect logs, identify the cause, apply a fix, and validate the workflow. For manual investigation and common failure modes, see Debugging Workflows.
Upgrading Workflows
Section titled “Upgrading Workflows”To upgrade the extension and the repository from its root:
gh aw upgradegh aw upgrade refreshes agentic-authoring files, applies codemods for deprecated workflow syntax, and recompiles workflows. Use --pre-releases to opt into pre-release versions, --no-fix to skip codemods and compilation, or --dir for a custom workflow directory.
Review the changes before committing:
git diff -- .github/workflows/ .github/skills/Commit workflow Markdown and generated lock files together. If the upgrade reports a migration or compilation error, run gh aw fix --write -v, compile the affected workflow, and consult the changelog and common issues.